Cartridges HP21 and HP22 can be found on the following printer, Hp deskjet 3920, D2400 series, D2466, D1300 series, PSC 1402, 1410 and many Hp printer again. Problem on the HP printer, if indicator ink level cartridges is empty, the printer cannot be use to print. (This methode can be used for HP Cartidges HP 27, HP, 28, HP 56, HP57, HP 58)
Reset Ink level on HP Printer that using cartdiges HP 21 and HP 22.
INK LEVEL RESET FOR HP Cartridges HP 21, 56, 58

- Remove cartridge from your printer.
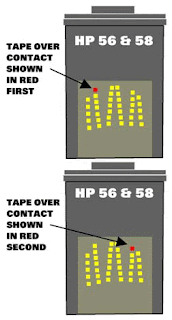
- Place a piece of tape over the top left contact as shown in red on the picture to the right. and then place cartridge back into printer.
- The printer will perform and alignment page. (Some newer models no longer print alignment pages. If printer runs through a series of priming routines and stops for 20 seconds continue through with next step.)
- Once an alignment page has been printed remove cartridge from printer and then place a piece of tape over the second contact shown in red. then Place cartridge into printer with both pieces of tape. (One covering the first contact and one cover the second contact.)
- Printer will print another alignment page. (Some newer models no longer print alignment pages. If printer runs through a series of priming routines and stops for 20 seconds continue through with next step.)
- Once the second alignment page has been printed remove cartridge from printer.
- Remove tape pieces from cartridge contacts Make sure there is no residual adhesive on cartridge contacts.
- Place cartridge into printer. Cartridge should now read full.
- Remove cartridge from your printer.
- Place a piece of tape over the top left contact as shown in red on the picture to the right.
- With the tape covering the contact place cartridge back into printer.

- The printer will perform and alignment page. (Some newer models no longer print alignment pages. If printer runs through a series of priming routines and stops for 20 seconds continue through with next step)
- Once an alignment page has been printed remove cartridge from printer.
- Place a piece of tape over the second contact shown in red.

- Place cartridge into printer with both pieces of tape. (One covering the first contact and one cover the second contact.)
- Printer will print another alignment page. (Some newer models no longer print alignment pages. If printer runs through a series of priming routines and stops for 20 seconds continue through with next step.)
- Once the second alignment page has been printed remove cartridge from printer.
- Remove tape pieces from cartridge contacts
Make sure there is no residual adhesive on cartridge contacts. - Place cartridge into printer. Cartridge should now read full.
Once the second alignment page has been printed remove cartridge from printer.
ReplyDeleteThis comment has been removed by a blog administrator.
ReplyDeleteThis comment has been removed by a blog administrator.
ReplyDeleteThis comment has been removed by a blog administrator.
ReplyDeleteThis comment has been removed by a blog administrator.
ReplyDeleteThis comment has been removed by a blog administrator.
ReplyDeleteThis comment has been removed by a blog administrator.
ReplyDelete